CSS Selectors 101: Targeting Elements with Precision
Imagine you're at a big family gathering with dozens of people. You want to give instructions—maybe you're telling everyone named "John" to grab plates, or you're asking only people wearing red shirts to help with setup, or you're pointing directly at your best friend to sit next to you. That's essentially what CSS selectors do: they let you pick exactly which HTML elements should receive your styling instructions.
Without selectors, CSS would be like shouting instructions with no way to target specific people—everything would either style or nothing would. Selectors are the connection between your CSS rules and your HTML. They're the foundation that makes all of web styling possible.
Think of it this way:
HTML = The structure (paragraphs, headings, buttons)
CSS Selectors = The way to say "which of these should I style?"
CSS Properties = The actual styling (color, size, spacing)
The Three Core Selectors (In Order of Specificity)
Let's start with the most common selectors you'll use every day. I'm ordering them from broadest to most specific—this matters because specificity determines which style wins when multiple selectors target the same element.
1. Element Selector – The Broad Brush
An element selector targets all instances of a specific HTML tag. It's like saying "Everyone with the tag name 'p'—here's your style!"
Syntax:
p {
  color: navy;
  font-size: 16px;
}
HTML:
<p>This paragraph is navy blue.</p>
<p>So is this one.</p>
<p>And this one too!</p>
Browser Output:
| Without Selector | With Element Selector |
| All three paragraphs appear in default black. | All three paragraphs turn navy blue and grow to 16px. |
When to use: Element selectors are perfect for setting baseline styles across your entire site—like making all headings use a specific font, or giving all paragraphs consistent spacing. They're broad, reusable, and great for consistency.
2. Class Selector – The Flexible Grouper
A class selector lets you target elements by assigning them a shared label (class). Think of it like putting stickers on certain items at that family gathering. Multiple elements can have the same class, and one element can have multiple classes.
Syntax:
.highlight {
  background-color: yellow;
  padding: 5px;
}
HTML:
<p>This paragraph is normal.</p>
<p class="highlight">This one has a yellow background!</p>
<p>Normal again.</p>
<span class="highlight">Buttons and spans can have this class too!</span>
Browser Output:
| Without Class | With .highlight Class |
| All elements are unstyled with default colors. | Only elements with class="highlight" get the yellow background. |
Why classes are powerful: You can apply the same class to different element types (paragraphs, divs, buttons) and style them identically. You can also combine multiple classes on one element:
<p class="highlight bold">Multiple classes on one element!</p>
.highlight {
  background-color: yellow;
}

.bold {
  font-weight: bold;
}
When to use: Class selectors are the workhorses of modern CSS. Use them for reusable, modular styles. Building a component library? Classes are your answer.
3. ID Selector – The Unique Identifier
An ID selector targets a single, unique element on your page. Think of it like pointing directly at one specific person at the gathering. Each element should have at most one ID, and each ID should appear only once per page.
Syntax:
#main-heading {
  color: darkblue;
  font-size: 2em;
}
HTML:
<h1 id="main-heading">Welcome to My Site</h1>
<h1>Another Heading (not styled by #main-heading)</h1>
Browser Output:
| Without ID Selector | With #main-heading |
| Both headings use default styling. | Only the element with id="main-heading" gets the dark blue color and larger size. |
Important: IDs have very high specificity, which means they override classes and element selectors. Use them sparingly—mainly for unique, page-level elements like navigation headers or page footers.
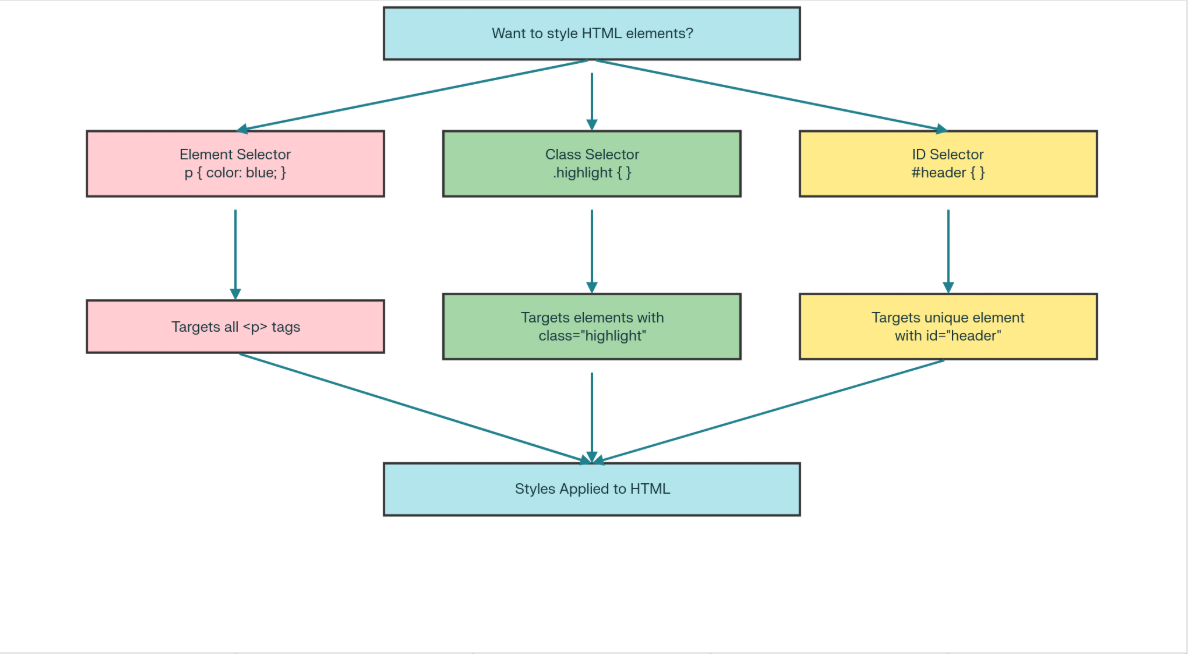
CSS Selector Selection Flow - Choose the Right Selector for Your Needs
Group Selectors – Styling Multiple Elements at Once
Sometimes you want to apply the same style to multiple different elements without repeating your CSS. The group selector (comma) lets you do this efficiently.
Syntax:
h1, h2, h3 {
  font-family: 'Arial', sans-serif;
  color: #333;
}
HTML:
<h1>Main Title</h1>
<h2>Subtitle</h2>
<h3>Small Title</h3>
<p>This paragraph is NOT affected.</p>
Browser Output:
| Without Group Selector | With h1, h2, h3 |
| All headings use browser defaults. | All three heading levels now use Arial and dark gray color. |
Pro tip: Group selectors keep your code DRY (Don't Repeat Yourself). Instead of writing the same styles three times, you write them once and separate selectors with commas.
Descendant Selectors – Targeting Elements Within Elements
A descendant selector lets you style an element only when it's inside another specific element. You create this by typing two selectors with a space between them.
Syntax:
div p {
  color: green;
}
This means: "Select all <p> tags that are descendants of a <div>" (anywhere nested inside, not necessarily direct children).
HTML:
<div>
  <p>This paragraph is inside a div—so it's green.</p>
</div>

<article>
  <p>This paragraph is inside an article—NOT affected, stays default color.</p>
</article>

<p>This paragraph is standalone—also stays default color.</p>
Browser Output:
| Without Descendant Selector | With div p |
| All paragraphs use default black text. | Only the paragraph nested inside the div turns green. |
Real-world example: Maybe you want to style links differently depending on context:
/* Links inside navigation bars */
nav a {
  color: white;
}

/* Links inside articles */
article a {
  color: blue;
  text-decoration: underline;
}
Important note: Use descendant selectors thoughtfully. While they're powerful, overly nested selectors can make your CSS harder to maintain. Modern best practice often leans toward using classes instead for clarity.

CSS Selector Priority Hierarchy - Understanding Specificity
Basic Selector Priority (Specificity) – High Level Overview
This is crucial: when multiple selectors target the same element, CSS has a tiebreaker system called specificity. The rule from the most specific selector wins.
Here's the pecking order:
ID selectors (
#id) – Highest priorityClass selectors (
.class) – Medium priorityElement selectors (
p,div) – Lowest priority
Example:
p {
  color: black;  /* Element selector */
}

.special {
  color: blue;  /* Class selector */
}

#unique {
  color: red;  /* ID selector */
}
<p>Black text (element selector wins)</p>
<p class="special">Blue text (class selector overrides element)</p>
<p id="unique">Red text (ID selector overrides everything)</p>
Why this matters: If you're wondering why your styles aren't applying, it's often because a more specific selector is overriding them. This is why ID selectors should be used sparingly—once you use an ID, it's very hard for other selectors to override it, which makes your CSS less flexible.
Putting It All Together – Real-World Example
Let's build a simple card component to see all these selectors in action:
HTML:
<div class="card">
  <h2 class="card-title">Featured Article</h2>
  <p class="card-text">This is a short description.</p>
  <a href="#" class="card-link">Read More</a>
</div>

<div class="card featured">
  <h2 class="card-title">Special Article</h2>
  <p class="card-text">This has extra styling.</p>
  <a href="#" class="card-link">Read More</a>
</div>
CSS:
/* Element selector – base styles for all divs */
div {
  border: 1px solid #ccc;
  padding: 20px;
}

/* Class selector – reusable card styling */
.card {
  background-color: #f9f9f9;
  border-radius: 8px;
}

/* Descendant selector – paragraphs inside cards */
.card p {
  line-height: 1.6;
  color: #555;
}

/* Multiple classes – more specific styling */
.card.featured {
  background-color: #fff3cd;
  border: 2px solid #ffc107;
}

/* Group selector – consistent heading sizes */
h1, h2, h3 {
  font-family: 'Helvetica', sans-serif;
}

/* Element inside a class – links in cards */
.card a {
  color: #007bff;
  text-decoration: none;
}
Browser Output:
| Without CSS | With CSS |
| Plain, unstyled HTML boxes and text. | First card has gray background with rounded corners and styled text. Second card (.featured) has yellow background and bold border, making it stand out. |
This example shows how selectors layer:
The
divelement selector creates base structureThe
.cardclass creates reusable component stylingThe
.card.featuredcombination adds variationDescendant selectors style specific content within cards


